PROJECT FROSTY
The icebox on a CD25 is permanently installed under the companionway, and forms the first step into the cabin. The interior of the icebox is gelcoat on a
liner of fiberglass. This is covered by one inch thick polyurethane sheet foam, and encapsuled in a layer of glass mat. The lid consists of
one inch urethane foam which fits into the inner liner, and is attached to the underside of plywood which forms the step.
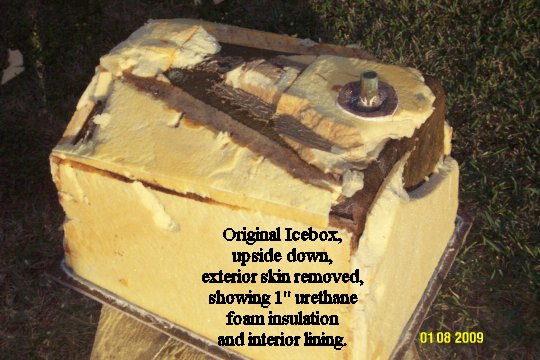
Here is a photo of the original icebox (upside down) in which I have cut away the outer layer of matt, exposing the urethane foam and inner liner.
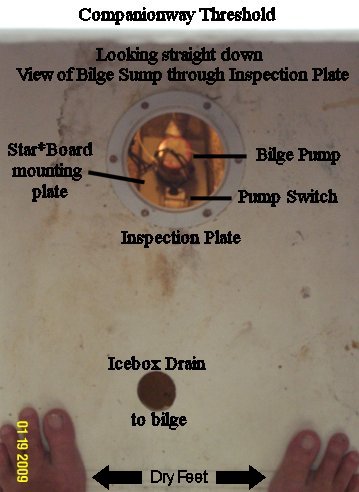
The construction and installation of the icebox presented an opportunity for improvement in several ways. First, the only adequate access to the bilge
sump is under the icebox, where I have installed an inspection plate to access the bilge pump (See Project Dry Foot). To get to this inspection plate,
I needed to make the icebox removeable.
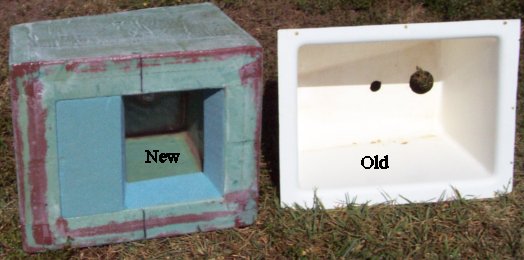
Second, the insulation of the original icebox is woefully inadequate, and it is more a cooler than an icebox. While a custom built icebox would be able to
employ the "wasted space" inherent in the original installation, the urethane foam insulation should ideally be 6" thick. The space available simply could
not afford this luxury, so I used 4" insulation consisting of two layers of 2" foam. The result is a rather small interior space (about 1&1/3 cubic feet)
but with a dramatically improved quality of thermal isolation. Here is a photo which compares the old and the new.
I wanted to use the original bronze "Cape Dory" drain, but extricating it from the old icebox was a challenge. I resolved this by cutting around it with
a jigsaw to remove it from the original box (inner and outer shell). I then used a propane torch to burn away the polyester resin and fiberglass it was encased in.
A mild abrasive wheel brought back the luster. The drain fit nicely into a 3/4" PVC fitting.
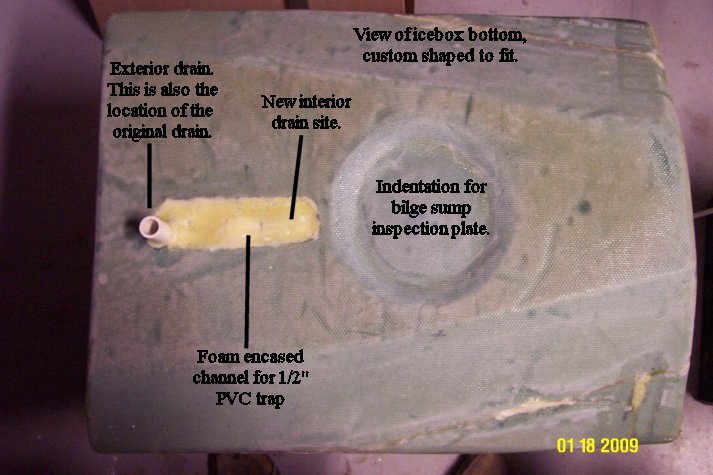
Third, the original drain emptied straight into the bilge. This is not ideal because cold air is heavy, and will simply drop down the drain. Thus, I constructed
a water trap out of 1/2" PVC pipe. The bronze drain was attached to the PVC trap with a 3/4" - 1/2" reducing elbow, and was cemented in with urethane (Gorilla) glue.
I cut a channel into the 4" icebox urethane, put the drain/trap in place, and filled the channel with expanding (Great Stuff) urethane foam, which I trimmed flush after
curing. Thus, both the drain and the trap are encased within the insulation. The resulting exterior drain empties at the same location as the original (slightly
off-center for some reason,) but the interior drain is now more centralized. Here is a photo showing the channel.
Don Casey's (my Guru) method of construction is to build an outer box of wood, cover it in glass, then build an inner box of wood, glassed inside, and put the foam
between the two boxes during construction. I chose to build the box entirely out of foam, eliminating the inner and outer wooden boxes. This had two advantages:
First, it enabled me to make a 'form-fitted' icebox. Second, it saved me an inch of space in each dimension, maximizing the interior volume of the icebox.
Nor did I wrap the construction with plastic (vapor barrier), as he recommends, because, well, it's wrapped in epoxy plastic already. I did not wrap it in
aluminum foil (as Casey recommends) either, because on two sides I didn't want it to interfere with the bonding between the box and the wood.
I could cover the other four sides with aluminum foil at a later date if I feel it would make a difference in performance.
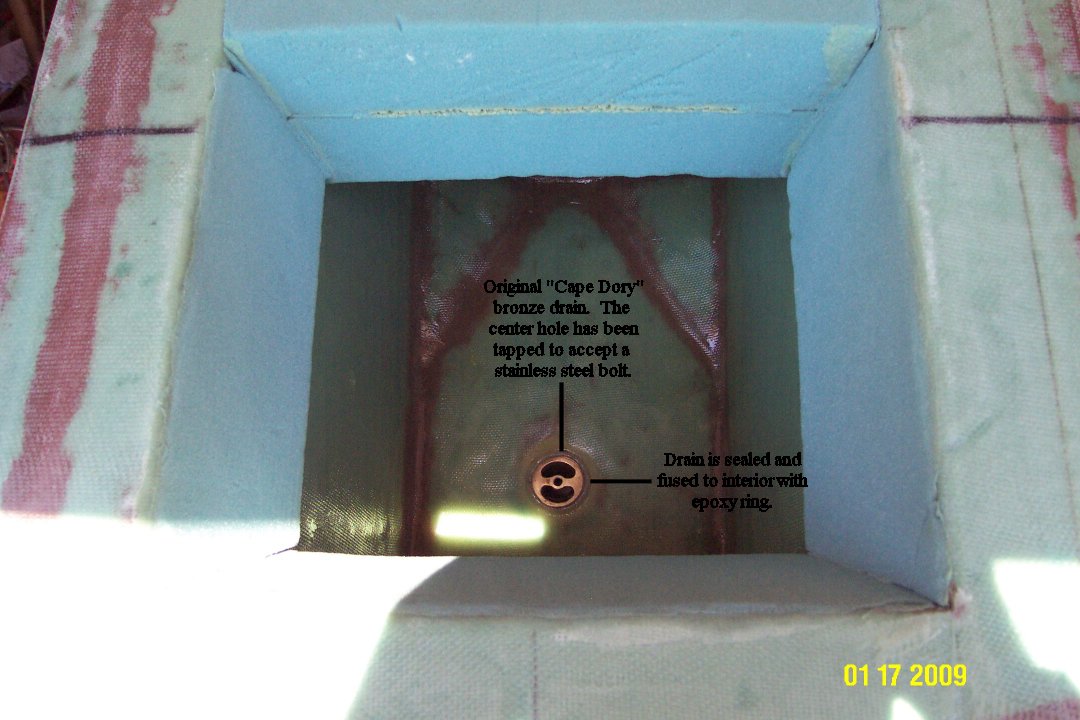
When glassing the interior in epoxy, I taped over the drain and glassed 5 layers over it. When cured, I cut through the glass with a hole saw to uncover the drain.
I then filled the gap (created around the drain by the hole saw) with epoxy to seal it and bond the drain to the interior glass. The fiberglass plug which I removed from
over the drain, augmented by a rubber gasket, became the drain plug. I tapped the center hole of the Cape Dory drain and fitted the drain plug with an
appropriately sized stainless steel bolt, so the plug screws down tightly to the drain.
Here you can see the interior drain installed.
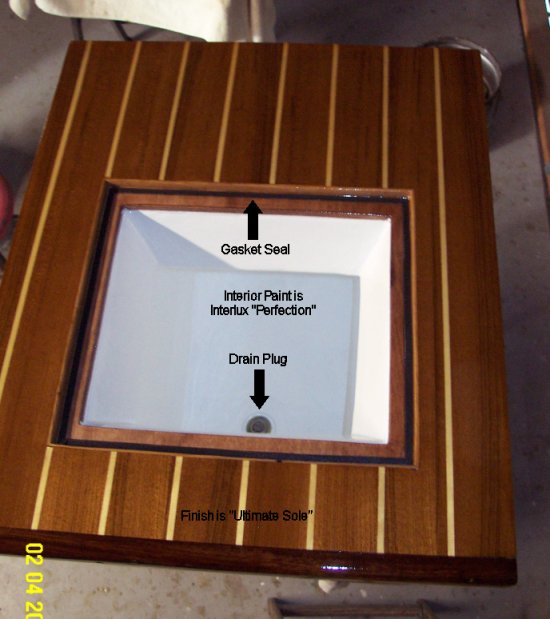
Finally, here is the finished icebox, looking into the interior from above. You can see the drain plug in place, and the gasket to seal around the lid.
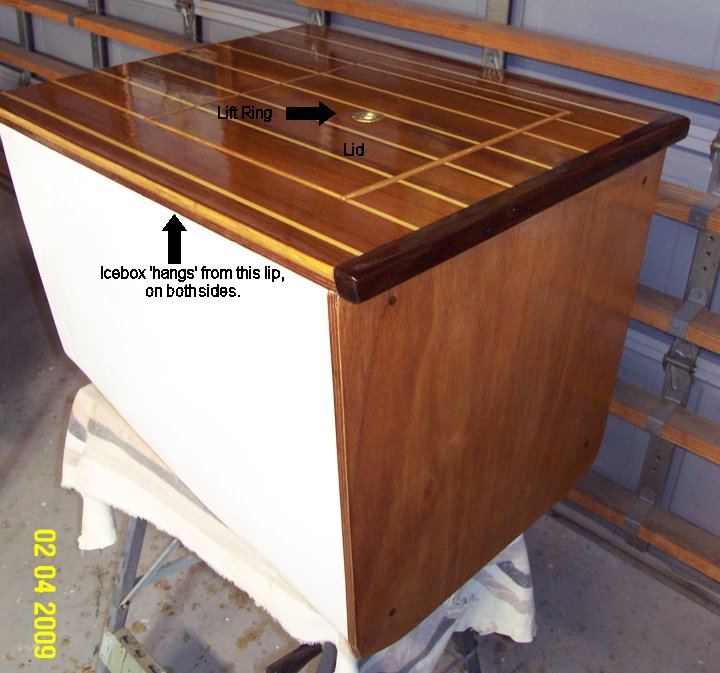
This shows an exterior view of the finished icebox, with the lid in place. It was not necessary to paint the exterior of the box because it
will not be visible, but I had leftover paint that would have gone to waste because I mixed too much of the two-part polyurethane paint I used for
the interior.
The top of the icebox is two sheets of 1/2" plywood bonded together, making it one inch thick. When installed, the icebox 'hangs' from the top,
suspended along both sides of the lip. The front facade 'pretties-up' the cabin side, but also serves to support the front edge of the step,
and to help support the bottom step when installed. The four bungs in the front panel are there to cover short wooden dowels which were used for
alignment purposes during construction. Unlike the Cape Dory icebox, which used steel nails to 'pin' the urethane foam panels together
during assembly, there was no metal used in the construction of this icebox, except the bronze drain, stainless drain plug, and brass lift-ring.
The finished icebox weighs about 40 pounds. Only about 8 pounds of that is for the foam. The remaining 32 pounds is for contact cement,
wood, fiberglass cloth, epoxy, and paint.
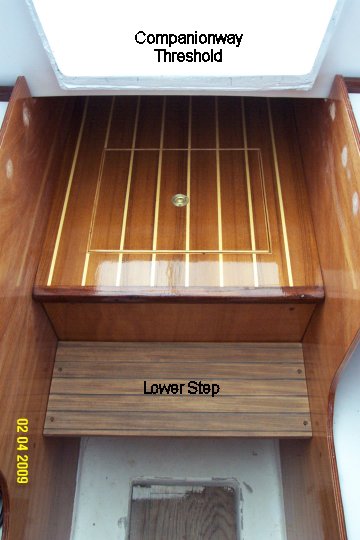
Here, the icebox and lower step are fit in place, but are not installed, for a final check of fit and finish. The lower step is one of the few pieces
of wood from the original installation which is still usable. Being teak, it took the neglect well because it was interior to the cabin and thus not exposed
to the Florida elements. I have not decided whether or not to put a finish on it, but am inclined to just clean it up and leave it bare.
PLEASE CHECK BACK LATER